 |
The Neuron_Morpho plugin for ImageJ allows the user to measure the x, y and z coordinates of a selected point of a stack of confocal images and the radius of the corresponding section of the neuron together with other information that can be used to reconstruct the neuron morphology. The measurement output is in swc format. It is possible to transform it in a hoc file for the program neuron (written by Ted Carnevale and Michael Hines, http://www.neuron.yale.edu/neuron/newhome.html) using the neuron morphology viewer cvapp (written in Java by Robert Cannon and available at http://www.compneuro.org).
Once the plugin has been installed (see the Downloading and installation section) we can measure the morphological data of a given neuron whose confocal images are stored in an ImageJ stack. The steps involved are (see following sections for more detailed explanations):
In order to use the Neuron_Morpho plugin ImageJ must have been installed. It can be downloaded from http://imagej.nih.gov/nih-image/. If one wishes to compile the plugin then also a suitable version of Java must have been installed (see the ImageJ documentation for further information).
The plugin, this manual and all the files used in this example can be downloaded from the Neuron_Morpho plugin home page at the URL
The plugin is written in Java: its source code is contained in the file ``Neuron_Morpho.java''. You can run the plugin by downloading only this file and, eventually, the online documentation. However, it is probably easier to download the zipped archive ``Neuron_Morpho.zip'', that contains the online documentation, the executables and the source code.
In order for this installation to work a suitable version of Java must have been installed (see the ImageJ documentation for further information).
Unless you have chosen the ``Easy install'' option you must install the documentation by hand.
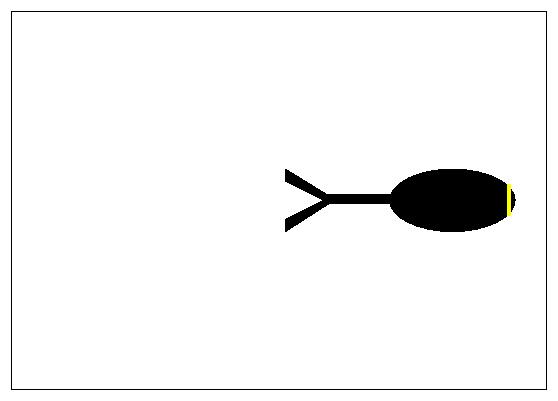
Load the stack of images either using the Biorad reader plugin (for biorad stacks) or the open command in the file menu of ImageJ (for more standard stacks of images). It is convenient to produce a z-projection (Image/Stacks/Z project, choose either average intensity or maximum intensity) of the neuron to use it as a map for later on (see Figure 1). If the neuron contains many small details it may be advantageous to print more detailed maps of smaller regions and/or to make projections of fewer slices.
|
The Neuron_Morpho plugin allows us to take measurements by drawing a straight line across the section of the neuron that we wish to represent: the plugin obtains the radius of the section by computing the length of the line and dividing it by two. The coordinates of the centre of the line are the x and y coordinates of the point. The z coordinate is the index of the current slice. The data for each represented point is in the following format (swc format):
In this format, n is an integer label (normally increasing by one from one line to the next) that identifies the point. T is an integer that represents the type of neuronal segment. The convention used by this plugin is given by the following table:
| Value | Meaning | Value | Meaning |
| 0 | Undefined | 4 | Apical dendrite |
| 1 | Soma | 5 | Fork point |
| 2 | Axon | 6 | End point |
| 3 | Dendrite | 7 | Custom |
The ``custom'' entry could be used to identify sections that have a particular meaning for a specific neuron. The user never sees the integers: the plugin automatically transforms them using the above table and prints the type of section in words. x, y and z are the three coordinates of the point of the neuron and R is the radius of the section. P is an integer that represents the point preceding the current one when moving away from the soma. It is usually the label of the point of the previous row except for the first row (where it set to -1) and at forks in the neuron (see later). The swc file may contain a header with comments. Each line of the header must start with a ``#'' (hash) character.
Start the Neuron_Morpho plugin by selecting it from the Plugins menu. A separate window should appear (see Figure 2). The centre of the window is a table whose columns correspond to the headings of the swc format. Each new measurement is added at the first empty line. The top row contains four buttons:
The bottom row contains two buttons:
The start and stop buttons can be pressed as many times as one likes during a single measurement session. The new data will always be appended at the bottom of the table.
The Neuron_Morpho plugin allows us to take measurements by drawing a straight line across the section of the neuron that we wish to represent. Moreover, measurements are taken only if the Shift key is pressed all the time that the mouse is dragged. This means that the image can be manipulated while taking measurements without affecting the measurement process. If we wish to have a visual aid when measuring, we should press the line selection button in the ImageJ tool bar. Finally, before starting taking measurements it is convenient to choose a path on the neuron along which to take the measurements. The Neuron_Morpho plugin assumes that the path chosen will be to follow a branch to its end, then backtrack to the last fork and follow the other branch to the end and so on (see Figure 1). If this strategy is followed (and the ``fork'' and ``end points'' are dutifully entered) then the plugin will be able to correctly guess the entries in the ``Previous'' column. However, we may take the points in whatever we want (even random): in this case we will have to set by hand the entries in the ``Previous'' column because it is quite likely that the suggestions provided by the plugin will be inappropriate.
For the purpose of this example we will follow the path indicated in Figure 1. The stack of images (down-loadable from the Neuron_Morpho plugin homepage) that represent the toy neuron has on only three slices. The soma is the ellipse on the right hand side and is located in the middle slice. Go to that slice. The first point of the neuron that we wish to represent is the rightmost point of the soma. Keep the Shift key pressed during the entire measurement. Go to the top right hand most corner of the soma, press the left mouse button and drag the mouse down to the bottom right hand most corner. Release the mouse button keeping the Shift key pressed. A line (of an undefined colour) should appear on the neuron to indicate the selection. We can increase the thickness of the line by using Edit/Options/Line Width... (see Figure 3: in producing this figure a line thickness of 6 has been used and the colour of the selection has been changed by hand. A smaller thickness is probably more appropriate when making ``real'' measurements.)
 |
 |
 |
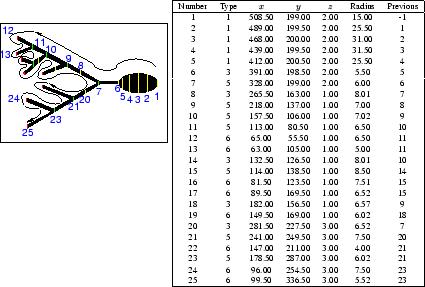
The following line should appear in the Neuron_Morpho plugin window (measurements taken by different people may be slightly different because they depend on the line drawn on the slice):
1 undefined 508.50 199.00 2.00 15.01 -1
The first number, 1, indicates that this is the first point, the second entry, undefined indicates that the plugin had no idea of what section has just been measured. This can be changed by clicking on the cell and choosing the appropriate entry from the list of options that will appear (see Figure 3). From now on the plugin normally assumes that the type of neuron section is the same as that in the previous row. However, if the previous measurement corresponds to either a ``fork'' or an ``end point'' the plugin assumes that the type of the current point is ``dendrite''. It is always possible to change the type of section by hand, if the suggestion offered by the plugin is inappropriate.
The third, fourth and fifth numbers of the line are the x, y and z coordinates of the point, the sixth number is the radius (all in pixels). The last number is the index of the previous point: since this is the first point this index is set to -1. Notice that the Neuron_Morpho plugin assumes that in general the ``previous point'' entry is the index of the point in the previous row. The only exception is when the point in the previous row is an ``end point'' in which case the ``previous point'' entry is the index of the most recently measured fork point that has only one branch. If this is not the case then the ``previous point'' entry may be edited by hand by clicking on the table cell. Any label can be entered, but there is also a pull down menu that contains all the fork points measured thus far (see Figure 4).
 |
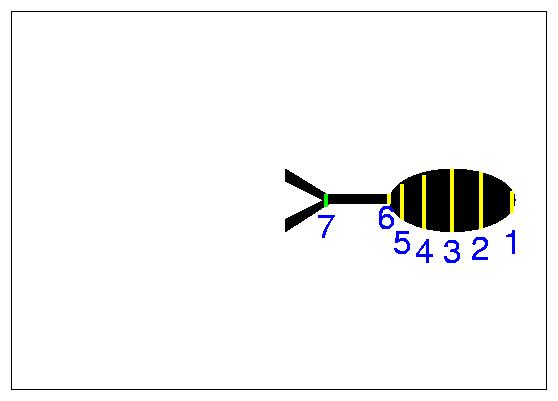
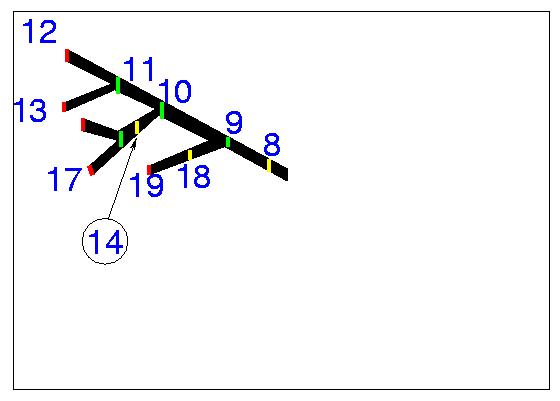
One should select points where the radius or the coordinates change appreciably (as in points 1 and 2 of Figure 5). The selected points on the middle slice are shown in Figure 5. At 7 the neuron branches and we have selected to follow the top branch. We follow this to the end (see Figure 6) and then get back to the bottom branch which we again follow sequentially to the end (see Figure 7).
 |
 |
 |
 |
The measurement process can be interrupted at pleasure by pressing the stop button. It can be resumed by pressing the start button. Moreover, the data can be stored in a file at any stage of the measurement process (and it may be a good idea to save them regularly just in case the computer should melt under the strain). Should we wish to stop completely, we can save the data to a file, quit the plugin and close ImageJ. Next time we can continue the measurements from where we had stopped by loading the measurement file using the ``Open'' button.
 |
Once all the measurements have been made we can save them to a file, e.g. morpho.swc and read it using the program cvapp, written by Robert Cannon (see Figure 8). This program can be downloaded from http://www.compneuro.org. Cvapp allows the user to edit the neuron structure, to scale the x, y and z coordinates, to view the neuron in 3D using red and green filter and, finally, to write the morphological data in a hoc file that can then be read by the program neuron, written by Ted Carnevale and Michael Hines (http://www.neuron.yale.edu/neuron/newhome.html). The neuron as loaded by the program neuron is shown in Figure 9.
 |
This document was generated using the LaTeX2HTML translator Version 98.2 beta6 (August 14th, 1998)
Copyright © 1993, 1994, 1995, 1996,
Nikos Drakos,
Computer Based Learning Unit, University of Leeds.
Copyright © 1997, 1998,
Ross Moore,
Mathematics Department, Macquarie University, Sydney.